Do you remember the desk beat up desk I found for my sons bedroom redo a couple of weeks ago, the one I paid a mere $15 bucks for? Well after a lot of hard work and maybe a little whining from me his desk is all finally completed. When I first started planning his bedroom makeover I thought a painted desk would look cute (but that was when I bought desk # 1) after buying his wood grain drum shade light fixture, I really wanted to stain his desk a deep walnut like our dining room table. However the top his is desk is laminate, so I went in another direction and was inspired by Young House Love's dresser to refinish Tabari's desk into a mix of modern and vintage. I have to say it was a lot of work, but so worth it. Before I show you the after, I have to remind you of the before, in all its glory (note the sarcasm)
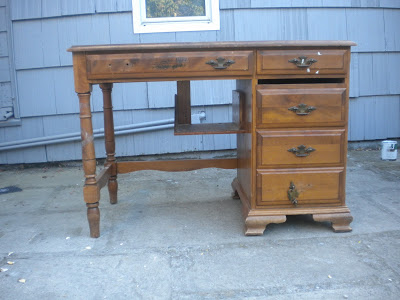
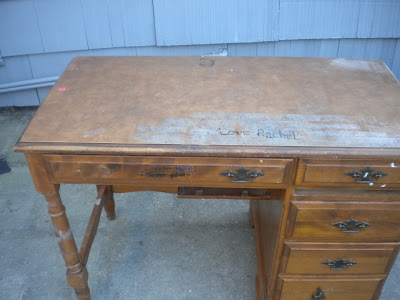


This desk was a hot mess: missing hardware and lots and lots of writing on the top of the desk and a funky box on the bottom of the desk. Even though it was a hot mess, I loved the vintage lines of the desk which gave it more charm. The desk was also a solid piece of furniture, all wood (except the very top) and super heavy.
After we refinished our dining room table, I received a lot of emails about the steps refinishing and sanding etc. Since I slacked and didn't do a how to post then, I created one for the desk.
How to Refinish a Desk
Like any painting project or staining project, clean the wood with a soapy water and a clean rag, and let dry.
Sanding
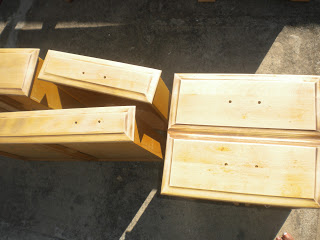
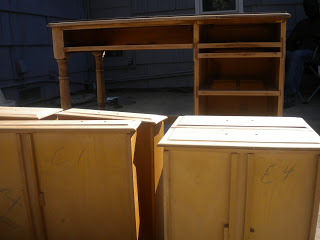
I sanded the entire desk with out Black and Decker Mouse power sander, I used 60 grit sandpaper. I made sure to sand in the direction of the wood grain, when you sand in the direction of the wood grain you get a nice smooth finish. I used a combination of the power sander and hand sander. Next I sanded the entire desk and drawers with a 220 fine grit sanding block, which leaves a nice smooth finish.
Staining
I love the staining part of this project the best, this is when you see all your handwork payoff. We used Minwax Wood Finish Dark Walnut 2716, fortunately we had left over stain from our dining room table project. I applied the stain with a brush going the same direction of the stain. I took my time applying the stain to the desk and made sure I made to drips on the desk finish. The directions recommended waiting waiting 5-15 minutes before wiping away excess stain. However I let the stain sit on the desk for 25 minutes so stain would really soak in. Then I wiped away the excess stain using lint free cloth, again wiping in the same direction as the wood grain.
I wanted the desk to be a nice rich dark oak, so I applied another coat of stain following the same directions as the first coat. After wiping down the second coat with a clean lint free rag, the desk was a nice rich dark walnut color I was looking for, so I only did two coats of stain.
Clear Coat
I let the desk dry 24 hrs and before starting the clear coat application. For the clear coat I sued Minwax Fast Drying Polyurethane Semi Gloss. Before applying the cleat coat gently stir the the polyurethane - do not shake. Wipe away all dust and then very lightly sand the desk in the direction of the wood grain using a 220 grit sanding block. Then apply a very THIN coat of polyurethane, I applied it using a sponge brush. The dry time on the label says 6-7 hours and then you can apply another coat, I didn't want the desk too glossy so I only applied one coat. I let the clear coat dry for 8 + hours and then again very light sanded the desk with a 220 grit sanding block. This stuff is smelly just like the stain, so I left the desk outside for 48hrs before bringing the desk inside my sons room.
Hardware
Finding hardware that fit the original wholes in the desk was a challenge! Most standard new pulls have whole spacing thats 3 inches apart, his desk and whole spacing that was 2.5 inches apart. I thought about drilling new wholes and filling the excitsing whole with wood filler like I did with my dresser (here) but I was afraid it might not stain properly. I used cup pulls for the dresser, which kept the vibe of the vintage desk.
For the top of Tabari's laminate desk I read YHL's instructions on using an oil based primer verses a water based primer (here) After I sanded the top of the desk, I primed the top of the dresser with 2 coats of Zisser Oil Base Primer using a sponge brush. I used two coats of primer because I wanted to make sure the writing has completely covered. I waited 30 minutes between coats of primer. Next I used a sponge roller and applied 2 coats of Valspar Gloss White Paint. Then waited and additional 24 hours to apply one thin coat of Clear Water Base Poly.
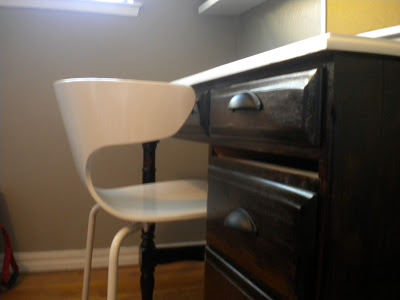
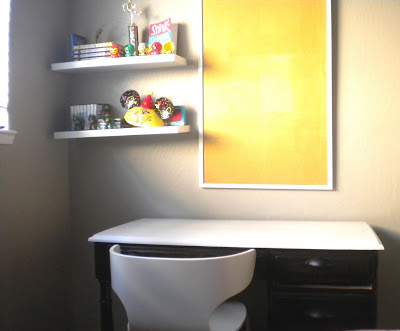
Here's Tabari's refinished desk in his bedroom. I love the contrast of the dark walnut stain and the glossy white desktop. I'm really glad the desk turned out nice!
For some reason it was really hardware me to take a good front picture of his desk (note to self, read the camera manual!) His desk is 99% done, I still have to cut a board to fix the gap in the desk, were a pull out board once was.
I like how the modern West Elm chair looks with his traditional desk.
Tabari's loves his new desk and thinks it looks cool. What do you think of his desk? Am I on the right track in creating a tween space that is a combination of modern and traditional?
ps: Here's a recap of completed projects & ideas for our sons tween room: Painted Room (here) Used Tools as Decor (here) Room Lighting (here) Found a Desk (here) Desk Chair (here) DIY Floating Shelves (here)