I recently shared Avery's DIY Customized Roman Shades, didn't they turn out amazing! I planned to share the How To earlier, but wanted to make sure my instructions were clear with lots of pictures so I waited a few more days to put together a more clear How To. I put together a How To for those of you that want to create custom roman shades for your home without the cost, did also I mention they are no sew?
I purchased Avery's Savannah II Roman Shades in cool white sale at JCP for super cheap, only $18.99 each (right now they're on sale, only buy them on sale, or check out Overstock for a similar look) The roman shades are ready made and come in standard window sizes, I ordered 39x64 and opted for a outside wall mount read here on how to measure for window blinds for an inside and outside mount. The roman shades I purchased from JCP have the boning on the outside, some roman shades have interior boning (so when Avery's roman shades are down which is only at night you can see the boning, the boning doesn't bother me, one thing I should add is roman shades with exterior boning require more fabric) I used about 3.5 yards of fabric for each Roman Shade.
On Measuring for Fabric [updated]
I received a good question in the comments about how much fabric is needed and wanted to go into more detail about. When I made the first Roman Shade, my friend and I measured and pinned all the fabric on the Roman Shade allowing for the exterior boning & cut the fabric. However when it can time to work on the second shade, I didn't have enough fabric, yikes! I had ordered 4 yards of fabric for both shades thinking that was more than plenty...When I worked on the second shade my new fabric order was 3.5 yards I didn't use that much fabric on the second, but had enough fabric left over for both Valances & lumbar pillow [for Avery's bed] Taking in consideration I was working with a geometric pattern and took more fabric to align the fabric properly on both valances and when starting the second Roman shade to make sure they matched perfectly, from left to right both of them match like identical twins.
The best way to estimate how much fabric you'll need for your shade is measuring your roman shade using a fabric tape, and measure the the exterior boning if you have it, then add in all your allowances and then give your self extra cushion for yardage & your valance (if you have one) The exterior boning really adds to the amount of fabric needed. For me it was trial and error [running out of fabric & ordering more]

For the Roman shades, I made for Avery's room I added a 1 inch seam allowance on the top left and right side of the shade. Do not cut the bottom of the fabric until all the fabric has been on attached to the the shade [See notes below]
Supplies
1. Roman Shade (white or Cream) 2. Hem Tamp 3. Scissors 4. Ruler (very helpful when using a pattern fabric) 5. Iron 6. Fabric 7. Glue Gun & Glue Sticks
Tip: The Roman shade should be placed face up the entire time while working on the project
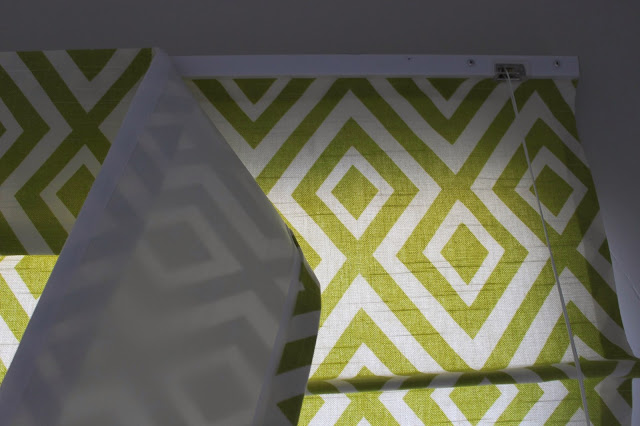
1. If your using a patterned fabric (geometric, floral, stripes etc) to recover the existing roman blind, think about the placement of the pattern on the shade. For floral patterns think about how each fold will fall and visually. For a geometric & stripe print you want to make sure the fabric is lined up perfectly on the header so the fabric stays straight. For Avery's shade, I found it easiest to use the raw blank edge of the fabric as my guild for the side of the roman shade. Before moving to step 2, iron your fabric. I know its hassle, but they'll be lots of ironing and pining and unpinning in my how to, but its all worth it in the end when the shades look so good!
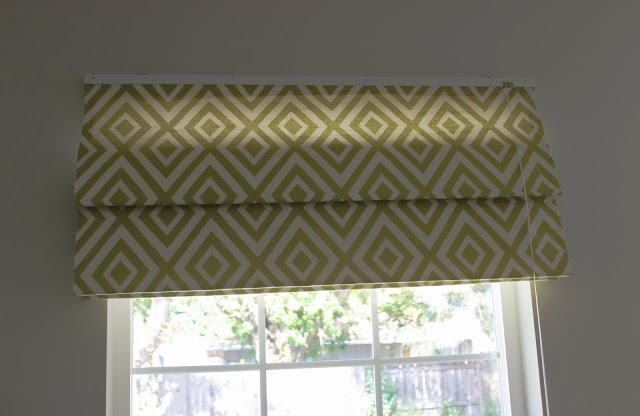
As you can see in the picture below, the pattern in the entire Roman shade is perfectly lined up. That's how you want your fabric to look while hanging on your blind.

2. Now that your pattern is lined up [and ironed] on the Roman shade at the top of the fabric, fold over one inch. This will be your seam allowance on the top. Now pin the fabric to the top of the Roman Shade.
3. Now that the top of the fabric is pinned to the Roman shade, fold over the fabric on the left side of the Roman shade 1 inch - this will be your seam allowance, that I mentioned above. Now pin this fabric to the roman shade.
4. Now that the top of the fabric and the left of the fabric has been pinned to the roman shade, fold over the fabric on the right hand side 1 inch. This is how the fabric is going to lay on your roman shade, make any adjustments if needed, and make sure its straight! Now pin your 1 inch seam allowance down. and pin to your Roman shade.
It's a good idea to pin all the fabric to your roman shade so you can see exactly how your roman shade is going to look.
5. Unpin the fabric to your roman shades, but leave the pins in so they are pinned to fabric itself. [set aside the Roman shade] Iron your all seam allowances on the top and right hand side. Next place your hem tape inside your seam allowances and iron again, your fabric is going to lay on top of your Roman Shade and the existing roman shade will act as your fabric lining. Once your sure the fabric is how you want it and fits perfectly on top of the Roman shade, cut the excess fabric on the right side, but leave your 1 inch ironed seam allowance.
6. Next place the fabric back on your Roman Shade and line it up making sure everything is straight. At the very top of the Roman Shade place the fabric under the header, this way the Roman shade looks like it was made this way, next using your glue gun apply a small bead of glue underneath your fabric at the header of the shade. [see pic below] and attach the fabric to your Roman Shade.
Roman Shades With External Boning
If your roman shade has external boning like mine, then place glue under the each boning [ see pic below] Do not glue the sides down on top of the Roman Shade, not gluing the sides down gives it a more relaxed and custom feeling [Don't worry the fabric will lay flat on the Roman shade]
Start the gluing process from top to bottom after gluing the fabric to the header [Remember not to cut fabric off at the bottom until you finished and attaching the fabric at the Roman Shade]
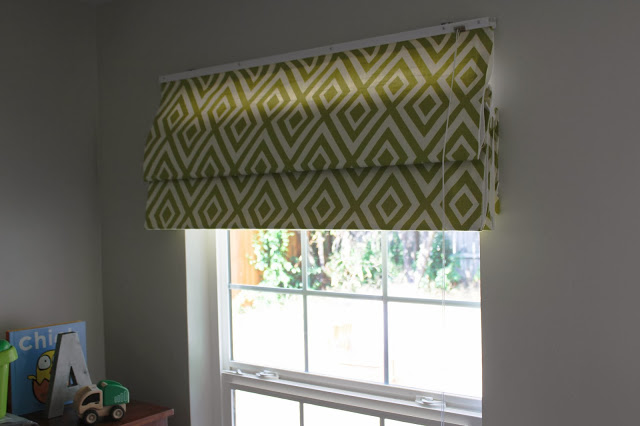
If you look closely in the picture below you can see the 1 inch seam allowance and see that the fabric has been glued underneath the boning and wraps around the boning on the Roman shade. As you can see the excising white Roman Shade is now the lining for the Roman shade.
Flat Roman
If your Roman shade is flat no external boning, then place your glue at each cease in the fabric [ see pic below] Start the gluing process from top to bottom after gluing the fabric to the header of the shade.
Before gluing fabric done on a flat Roman shade, pin the fabric on the ceases and see how the fabric looks, then glue.

Valance
The Savannah Roman Shades II, I purchased from JCP, came with a simple valance to cover up the header on the shade. The valance is attached with Velcro, making it super simple to recover.
1. Place the fabric on top of the valance and making sure the valance fabric lines up with fabric on the Roman shade. Fold over & pin the fabric on the top left and right side 1 inch and iron. This will be your seam allowance for the valance.
2. Next unpin the fabric from the valance and iron the seam, and then place hem tape inside your seam allowance and iron again. Cut any excess fabric that is beyond your seam allowance
3. Now glue the top of fabric on the valance, again the existing fabric is acting as a lining for your valance.
4. Next fold the bottom of the fabric underneath the valance, and do one more fold so the fabric is neatly tucked under the inside of the valance then glue in place. In the picture below you can see how the fabric is folded under the valance.
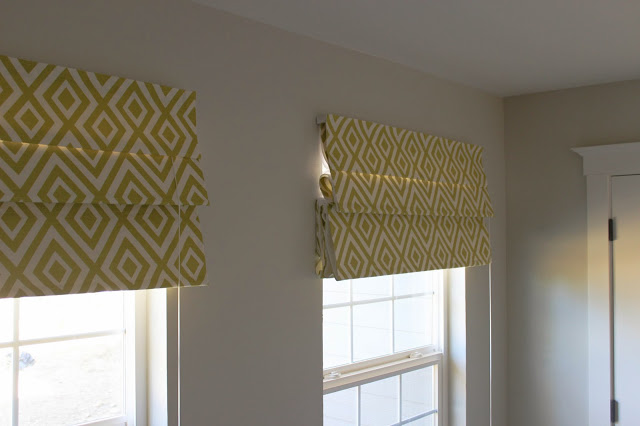

Your new customized Roman shade is done!! For this project, I found it easy to work with a girlfriend since there was so much fabric to deal with around 3.5 yards of fabric per Roman shade. It really helps to have a second pair or hands and eyes on this project! I'm not going to lie and say its super easy, but by Roman shade two, we got into a groove and knocked it out. It was worth all the pining and unpinning and ironing to wind up with two custom Roman shades that look amazing in Avery's toddler room!!
If you have any questions about the how to, please feel free to email me or leave a note in the comments!!
I'm already looking forward to working on my next Roman shade project for our house, I have three left I need to tackle!
I purchased Avery's Savannah II Roman Shades in cool white sale at JCP for super cheap, only $18.99 each (right now they're on sale, only buy them on sale, or check out Overstock for a similar look) The roman shades are ready made and come in standard window sizes, I ordered 39x64 and opted for a outside wall mount read here on how to measure for window blinds for an inside and outside mount. The roman shades I purchased from JCP have the boning on the outside, some roman shades have interior boning (so when Avery's roman shades are down which is only at night you can see the boning, the boning doesn't bother me, one thing I should add is roman shades with exterior boning require more fabric) I used about 3.5 yards of fabric for each Roman Shade.
On Measuring for Fabric [updated]
I received a good question in the comments about how much fabric is needed and wanted to go into more detail about. When I made the first Roman Shade, my friend and I measured and pinned all the fabric on the Roman Shade allowing for the exterior boning & cut the fabric. However when it can time to work on the second shade, I didn't have enough fabric, yikes! I had ordered 4 yards of fabric for both shades thinking that was more than plenty...When I worked on the second shade my new fabric order was 3.5 yards I didn't use that much fabric on the second, but had enough fabric left over for both Valances & lumbar pillow [for Avery's bed] Taking in consideration I was working with a geometric pattern and took more fabric to align the fabric properly on both valances and when starting the second Roman shade to make sure they matched perfectly, from left to right both of them match like identical twins.
The best way to estimate how much fabric you'll need for your shade is measuring your roman shade using a fabric tape, and measure the the exterior boning if you have it, then add in all your allowances and then give your self extra cushion for yardage & your valance (if you have one) The exterior boning really adds to the amount of fabric needed. For me it was trial and error [running out of fabric & ordering more]
For the Roman shades, I made for Avery's room I added a 1 inch seam allowance on the top left and right side of the shade. Do not cut the bottom of the fabric until all the fabric has been on attached to the the shade [See notes below]
Supplies
1. Roman Shade (white or Cream) 2. Hem Tamp 3. Scissors 4. Ruler (very helpful when using a pattern fabric) 5. Iron 6. Fabric 7. Glue Gun & Glue Sticks
Tip: The Roman shade should be placed face up the entire time while working on the project
1. If your using a patterned fabric (geometric, floral, stripes etc) to recover the existing roman blind, think about the placement of the pattern on the shade. For floral patterns think about how each fold will fall and visually. For a geometric & stripe print you want to make sure the fabric is lined up perfectly on the header so the fabric stays straight. For Avery's shade, I found it easiest to use the raw blank edge of the fabric as my guild for the side of the roman shade. Before moving to step 2, iron your fabric. I know its hassle, but they'll be lots of ironing and pining and unpinning in my how to, but its all worth it in the end when the shades look so good!
As you can see in the picture below, the pattern in the entire Roman shade is perfectly lined up. That's how you want your fabric to look while hanging on your blind.
2. Now that your pattern is lined up [and ironed] on the Roman shade at the top of the fabric, fold over one inch. This will be your seam allowance on the top. Now pin the fabric to the top of the Roman Shade.
3. Now that the top of the fabric is pinned to the Roman shade, fold over the fabric on the left side of the Roman shade 1 inch - this will be your seam allowance, that I mentioned above. Now pin this fabric to the roman shade.
4. Now that the top of the fabric and the left of the fabric has been pinned to the roman shade, fold over the fabric on the right hand side 1 inch. This is how the fabric is going to lay on your roman shade, make any adjustments if needed, and make sure its straight! Now pin your 1 inch seam allowance down. and pin to your Roman shade.
It's a good idea to pin all the fabric to your roman shade so you can see exactly how your roman shade is going to look.
5. Unpin the fabric to your roman shades, but leave the pins in so they are pinned to fabric itself. [set aside the Roman shade] Iron your all seam allowances on the top and right hand side. Next place your hem tape inside your seam allowances and iron again, your fabric is going to lay on top of your Roman Shade and the existing roman shade will act as your fabric lining. Once your sure the fabric is how you want it and fits perfectly on top of the Roman shade, cut the excess fabric on the right side, but leave your 1 inch ironed seam allowance.
6. Next place the fabric back on your Roman Shade and line it up making sure everything is straight. At the very top of the Roman Shade place the fabric under the header, this way the Roman shade looks like it was made this way, next using your glue gun apply a small bead of glue underneath your fabric at the header of the shade. [see pic below] and attach the fabric to your Roman Shade.
Roman Shades With External Boning
If your roman shade has external boning like mine, then place glue under the each boning [ see pic below] Do not glue the sides down on top of the Roman Shade, not gluing the sides down gives it a more relaxed and custom feeling [Don't worry the fabric will lay flat on the Roman shade]
Start the gluing process from top to bottom after gluing the fabric to the header [Remember not to cut fabric off at the bottom until you finished and attaching the fabric at the Roman Shade]
If you look closely in the picture below you can see the 1 inch seam allowance and see that the fabric has been glued underneath the boning and wraps around the boning on the Roman shade. As you can see the excising white Roman Shade is now the lining for the Roman shade.
Flat Roman
If your Roman shade is flat no external boning, then place your glue at each cease in the fabric [ see pic below] Start the gluing process from top to bottom after gluing the fabric to the header of the shade.
Before gluing fabric done on a flat Roman shade, pin the fabric on the ceases and see how the fabric looks, then glue.
Bottom of the Roman Shade
Once you've covered the entire Roman shade with your new fabric at the bottom simply tuck and fold your fabric under the Roman Shade cut and then glue, no raw edges of the fabric should be exposed.
(I will update this post with a picture of the bottom of the Roman shades)
The Savannah Roman Shades II, I purchased from JCP, came with a simple valance to cover up the header on the shade. The valance is attached with Velcro, making it super simple to recover.
1. Place the fabric on top of the valance and making sure the valance fabric lines up with fabric on the Roman shade. Fold over & pin the fabric on the top left and right side 1 inch and iron. This will be your seam allowance for the valance.
2. Next unpin the fabric from the valance and iron the seam, and then place hem tape inside your seam allowance and iron again. Cut any excess fabric that is beyond your seam allowance
3. Now glue the top of fabric on the valance, again the existing fabric is acting as a lining for your valance.
4. Next fold the bottom of the fabric underneath the valance, and do one more fold so the fabric is neatly tucked under the inside of the valance then glue in place. In the picture below you can see how the fabric is folded under the valance.
Your new customized Roman shade is done!! For this project, I found it easy to work with a girlfriend since there was so much fabric to deal with around 3.5 yards of fabric per Roman shade. It really helps to have a second pair or hands and eyes on this project! I'm not going to lie and say its super easy, but by Roman shade two, we got into a groove and knocked it out. It was worth all the pining and unpinning and ironing to wind up with two custom Roman shades that look amazing in Avery's toddler room!!
If you have any questions about the how to, please feel free to email me or leave a note in the comments!!
I'm already looking forward to working on my next Roman shade project for our house, I have three left I need to tackle!